Ranunculus Romance
Whenever I’m in a creative funk, I tend to go back to my favorite stamping style. I love the vintage look. There’s just something about ripping, crumpling, and adding ink willy-nilly that makes me happy. It’s probably because you don’t have to be as careful; if you make a mess, it’s ok.
The Ranunculus Romance Stamp Set and Ranunculus Dies are in the January-June Stampin’ Up!® Mini Catalog, so you still have through June 30 to order the stamps and dies as a bundle to save 10%. After that, you can still order them, since they carried over to the 2022-2023 Annual Catalog, but you’ll have to order them separately, because the bundle did not carry over. (So order now to save a little money!)
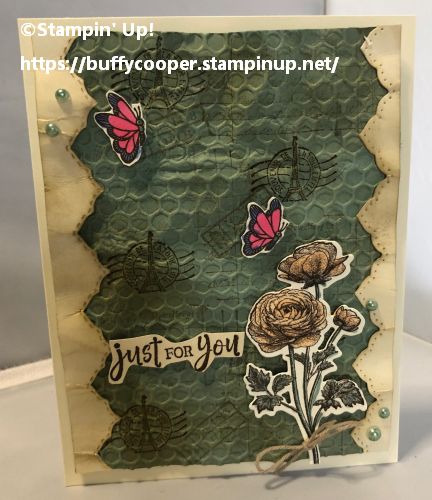
Although you can only see two, I used three stamps to add a background to the Soft Succulent Cardstock. I stamped the script (which you cannot see) and rectangular stamp in Crumb Cake Ink, and the postmark in Soft Suede on the 4″ x 5-1/4″ piece of Soft Succulent Cardstock. Then I spritzed the back with a little water and crumpled it into a little ball. After I straightened it out a bit, I embossed it with the Hive 3D Embossing Folder. I also added some Soft Suede ink over it with a Blending Brush.
Next, I used the Basic Borders Dies to die-cut two borders from Very Vanilla Cardstock. Again, I crumpled them, then added a little Crumb Cake Ink with my Blending Brush. I adhered the borders to the sides of the Soft Succulent layer, then adhered it to a Very Vanilla card base.
For the front of the card, I stamped the roses and sentiment from the Ranunculus Romance Stamp Set and the butterflies from the Happy Hedgehogs Stamp Set in Early Espresso Ink on Very Vanilla Cardstock. I colored them with Stampin’ Blends (Pale Papaya and Soft Succulent for the roses, and Orchid Oasis, Soft Succulent, and Polished Pink for the butterflies). The roses have a die, so they were easy to cut out with the Stampin’ Cut & Emboss Machine. I had to fussy cut the butterflies and sentiment, but they were still quite simple to cut out. I added these to the card with some Stampin’ Dimensionals.
I decided it needed a few embellishments, so I tied a piece of twine from the Baker’s Twine Essentials Pack to the roses. Last, I colored a few Basic Pearl Jewels with Soft Succulent Stampin’ Blends and added them to the borders.
I love how this card turned out! I know vintage isn’t everyone’s favorite style. My mom thinks they look messy and my friend Susan thinks they look like they were dropped in the mud. Mike always wants to know what the thought process is and what does the background mean. (He tends to “overthink.”) I, however, love the aged look and the small splashes of color. I love how Stampin’ Up!® has something for everyone!
Thanks for stopping by Stamping with Buffy. Have a lovely day!
Product List


Buffy, this is so pretty and so much fun. I love the two borders, all the crumpling and shading. Also the fact that Susan is likely squirming!
LikeLiked by 1 person
Thanks, Jackie! This got me out of my creative slump – and I know Susan is getting hives now! (But she’s at the cottage on the lake, so I’m not too sad for her.)
LikeLike
OK so I have to admit, it does look like it was dropped in the mud and stepped on by hundreds of people but if I use my imagination and try to figure out what it looked like before all that mishap, I would love it!
LikeLiked by 1 person
HA HA HA! I knew you’d think that. Maybe I will create one that hasn’t been stomped on and dropped in the mud to see what you think. You are so funny. I was feeling badly about you getting hives over this, but then I remembered you are at the cottage with the lake and gorgeous sunsets, so I’m over my guilt. Enjoy your summer!!! And thanks for posting more sunsets.
LikeLike