Shaker Stamp Off

Happy Friday, my friends! Today is another Stamp Off Challenge with Susan, Jackie, and me. Today’s challenge is to create a shaker card.
I think shaker cards are fun, but I have never enjoyed making them. It takes a lot of time, and no matter what I do, the “shaker items” stick to the foam tape or stick to the Window Sheet when I place it over the shakers. I almost always end up frustrated.
I was thrilled when one of the presenters at Stampin’ Up! OnStage in November demonstrated her Faux Shaker card. I may never make another real shaker again!
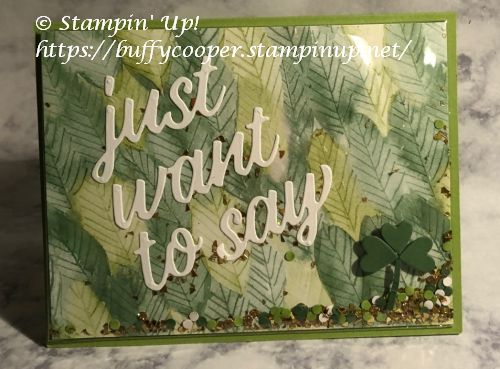
Here’s my shaker for today.
This card was so easy – and there’s no stamping! I diecut the sentiment from Basic White Cardstock using the Floral Gallery Dies from the Stampin’ Up! January-June Mini Catalog. I used Adhesive Sheets when I die-cut, so it was easy to adhere the words to the 4″ x 5-1/4″ paper from the Berry Delightful Designer Series Paper (DSP). This paper and the Berry Blessings Stamp Set are available through February 28 as a Sale-a-bration product. If your order is at least $100, you can select this bundle as a free product!
Next, I placed the DSP into a Clear Medium Envelope, making sure it was flush with the bottom and the end opposite the flap.
I didn’t have any green confetti, so I punched some Garden Green, Granny Apple Green, and Basic White circles and tossed them into the envelope. I used a retired 1/8″ circle punch, but there are lots of other options – hearts from the Dog Builder Punch, little pieces from the Detailed Trio Punch, small butterflies from the Butterfly Duet, and many more. I also added some Gold Glitter as well. Of course, Stampin’ Up! also has sequins you can use.
Next, I folded the flap edge of the envelope. I pulled it way down, farther than it would go if you were mailing a card, so that it would, again, be flush against the DSP. Next, fold the top of the envelope down so that edge is flush with the DSP as well. Use a piece of adhesive tape to adhere it to the back of the envelope. You may have to mitre the edges to make it look a lttle cleaner.
I adhered the envelope to a Granny Apple Green card base using Tear & Tape Adhesive. This works a lot better than liquid glue, because it won’t slide around. You can add anything you want to the front. Since this was for a St. Patrick’s Day theme, I diecut hearts from the Stitched Be Mine Dies and Garden Green Cardstock to create a Shamrock. (The stem is free-cut.)
So easy, don’t you think? And it’s still as fun and “shaker-y” as the “real” shakers.
Please take a few minutes to see what Susan and Jackie have created. I wonder if they will create real shakers or faux shakers. I can’t wait to find out!
Thanks for stopping by Stamping with Buffy. Have a lovely day!
Product List


I have to remember to add these envelopes to my next order!
Loved all 3 cards!
LikeLike
Thanks, Peggy! I love the faux shaker cards. They are so simple and fun!
LikeLiked by 1 person
Wonderful card Buffy. I love the idea of punching out the confetti for the card, as color coordinating is a challenge. Brilliant card
LikeLike
Thanks, Jackie! I realized I didn’t have any current sequins or confetti that would go with the colors. Oops!
LikeLiked by 1 person
Beautiful! I love this way to make a shaker. It is so much easier than the old way!
LikeLike
Thanks, Susan! I will probably never make another traditional one again!
LikeLiked by 1 person
What a fun shaker card! I love hacks that make creating easier 🙂
LikeLiked by 1 person
Thanks, Deborah! And so do I! These are so fun.
LikeLiked by 1 person
Pingback: Mountain Air Shaker Card | Stamping with Buffy