
 Tools Needed:
- Blossom Punch
- 2-3/8” Scallop Circle Punch
- 1-1/4” Scallop Circle Punch
- Spiral Flower Originals Die
- Big Shot
- Glue Gun
- Wire (I use 22 gauge)
- Needle Nose Pliers
- Wire Cutters
- Paper Piercing Tol
- Stampin’ Pierce Mat
- Silicone Craft Sheet
- Paper Snips
- Pencil, pen, or paintbrush
- Sponge
- Card Stock (Wisteria Wonder, So Saffron, Whisper White, Calypso Coral, Pear Pizzazz)
- Ink (Crushed Curry, Wisteria Wonder, Calypso Coral)
- Bone Folder
- Fringe Scissors
Step 1 – Jonquil (Note: I used this same process with the Fancy Flower punch in the photo) Punch 4 flowers using the Blossom punch. (I used three So Saffron and one Whisper White). Sponge ink on all petals. (I used Crushed Curry.) Snip approximately ½” into the center between each petal.
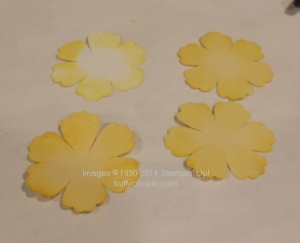
Step 1
Step 2 Curl the petals of two of the flowers around the pencil or paintbrush. Use a bone folder to curl the petals of the other two flowers under. Pull all the petals of one of the pencil-curled flowers into a cylinder.

Step 2a

Step 2b
Step 3 Put a dab of hot glue in the center of the second pencil-curled flower; set the first into it.

Step 3
Step 4 Pull those petals up. Squirt a dab of glue on one of the last two petals (I inserted the white flower here), and center the first two flowers in the glue.

Step 4
Step 5 Cut an 8” length of wire for each flower you’re going to make. Using needle nose pliers, make a loop in one end. Pierce the center of the remaining flower with a paper piercing tool. Insert wire, ensuring the looped end is flat.

Step 5a

Step 5b
Step 6 Punch a 1-1/4” Scallop circle from green card stock (I used Pear Pizzazz). Pierce a hole in the center, and snip from one edge of the circle to the center. Overlap one or two scallops, and glue. Pierce center of scalloped circle one more time, then insert wire through hole. Secure to flower with hot glue.

Step 6a

Step 6b
Step 7 Cut a strip of 1″ x 4″ So Saffron card stock. Fold in half lengthwise. Unfold; add a strip of Fast Fuse adhesive along both short ends, fold and adhere. Using fringe scissors, fringe the piece. Roll tightly, with open fringe end up. Add a bit of Fast Fuse adhesive along short end to secure. Hot glue to center of flower.

Step 7
Step 8 – Carnation Punch four 2-3/8” scallop circles (I used Wisteria Wonder) and one 1-1/4” scallop circle (I used So Saffron.) Optional: Cut between each petal from edge of circle toward center (stopping about ½” from center) on one flower. Snip off two scallops. Overlapping one scallop, glue to form a cone. Optional: Cut between every two scallops on the second flower, stopping about ½” from center. Snip off one scallop. Overlapping one scallop, glue to form a cone. Not optional: Spritz flowers with a little water, then scrunch.

Step 8a

Step 8b
Step 9 “Unscrunch” the four larger scallop circles and layer, making sure the two conical flowers are on top. (The one with two scallops missing is the very top.)

Step 9
Step 10 Prepare wire as in Step 5. Pierce through all four circles with Paper Piercing tool, then insert wire, with the looped end flat on top of the flower. Punch a 1-1/4” Scallop circle from green card stock (I used Pear Pizzazz). Pierce a hole in the center, and snip from one edge of the circle to the center. Overlap one or two scallops, and glue. Pierce center of scalloped circle one more time, then insert wire through hole. Secure to flower with hot glue.

Step 10
Step 11
Hot glue the final 1-1/4” circle into the center, over the wire loop. Scrunch all layers around the center. Then relax them, using your fingers.

Step 11a

Step 11b
Step 12 – Rose
Die cut the spiral flower with the Spiral Flower Originals die. Use a bone folder to break down the card stock fibers and being the curling process.

Step 12
Step 13
Begin rolling, starting at the thinnest end. When you reach the final, larger scallops, let the flower unfurl a bit. Add hot glue to the last, largest scallop and scure the rest of the flower to it.

Step 13a

Step 13b
Step 14
Squirt a dab of hot glue to the back of the flower. Place prepared wire (from Step 5) into the glue and hold for a few seconds.

Step 14
Step 15
Punch a 1-1/4” Scallop circle from green card stock (I used Pear Pizzazz). Pierce a hole in the center, and snip from one edge of the circle to the center. Overlap one or two scallops, and glue. Pierce center of scalloped circle one more time, then insert wire through hole. Secure to flower with hot glue.

Finished Flowers


Beautiful!
LikeLike
Thanks so much for sharing your tips and techniques! They’re beautiful!
LikeLike
Really loved these.
LikeLike
Pingback: Spring Flowers Tutorial | Stamping with Buffy
Gorgeous flowers! Thanks Buffy for the step by step tutorial. Very kind of you to share all the details and the labor involved in posting. ♥♥♥
LikeLike