Artistically Inked
Today was a good day! Ok – any day I can stay home for most of the day, see two of my kids and my amazing granddaughter is an awesome day. And to top it off, my Stampin’ Up! Annual Catalog order also came today. So it was more than a good day; it was a great day!
My order arrived shortly before I was scheduled to pick Amelia up from school, so I didn’t get to play a lot. But I haven’t seen Amelia since I dropped her off at school on Tuesday, so I was excited to pick her up today. She was so cute. When she saw me in the pick-up line, she cried, “Seesa! Seesa! Seesa!” all the way to the car. That totally made my day. I know those of you who live far from your grands and only see them a few times a year think I’m a wimp – and you’re right. I was with that little girl almost every day for five years of her life. Now that she’s in school and others are picking up and dropping off, it’s hard to go a day or more without seeing her.
But, oh, my goodness, is she thriving in school. Her handwriting is better than mine, she can add and subtract like a calculator, she can fussy cut better than most crafters I know, and she knows – and loves – science stuff. Her school makes learning so much fun. (My school sucked all the fun out of everything – especially science. It wasn’t until I homeschooled Jon and Wes that I started to love science.)
Amelia’s school is a community. She loves her other first grade friends, but she also “socializes” with younger and older age groups – so she doesn’t have a problem relating to kids who aren’t her age as well as adults. It’s the best school in our area, and I’m so happy she can attend there.
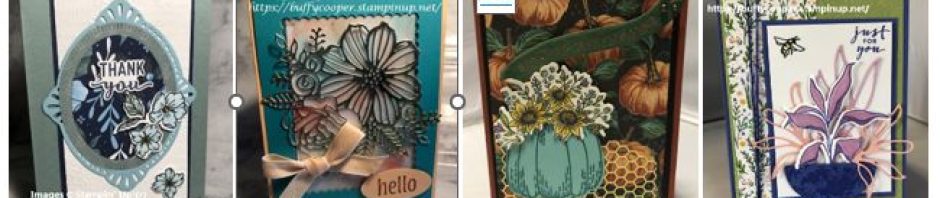
After Wes picked her up, I spent some time in my craft room and created this card.

The Artistically Inked Stamp Set (and bundle, with the Artistic Dies) is one of my absolute favorite bundles in the new Annual Catalog. It may be my favorite ever.
For this card, I used a couple alcohol ink techniques. First, I scribbled on Vellum Cardstock with Dark Cajun Craze and Dark Bermuda Bay Stampin’ Blends. Then I used a paint brush and rubbing alcohol (91%) to move the ink around on the vellum. Note: You really need to use 91% or higher alcohol for this to work.
I used the Stitched So Sweetly Dies to die-cut the center of a 4″ x 5-1/4″ Bermuda Bay layer. I added the Vellum background piece to a Basic White layer (4″ x 5-1/4″), then added a 4-1/4″ x 5-1/2″ Window Sheet layer over it. I added all the background layers to the Bermuda Bay die-cut, then added it all behind the window in the Bermuda Bay Cardstock layer. Next I added all of that to a Pale Papaya card base.
While I was looking for the perfect piece to die-cut the floral image, I found a piece of foil that I had played with earlier. I think it may be Champagne or Silver Foil, but it’s been a long time, so I don’t know for sure. I had scribbled on the foil with Stampin’ Blends, then I spritzed it with alcohol. The picture doesn’t show the amazingness of the alcohol ink on the foil. It’s gorgeous! I used one of the dies from the Artistic Dies to cut the floral die-cut. I added the die-cut to the card using the glue tip from earlier. (Clip a binder clip to a sponge wedge, then dip the wedge in Multipurpose Liquid Adhesive. Apply the adhesive to the die-cut, then adhere the die-cut to the project.)
Here are the final touches. I stamped the sentiment from the Artistically Inked Stamp Set in Cajun Craze Classic Ink on Pale Papaya Cardstock, then punched with the Double Oval Punch. I adhered it to the bottom right of the card with Stampin’ Dimensionals. Then I created a bow from the Pale Papaya/White Ribbon and added it to the card with a Mini Glue Dot.
How much do you love the Stampin’ Up! Annual Catalog? There is so very much to like – the chalk pastels, the Designer Series Paper, the stamps and bundles, and, of course, the new colors! If you don’t have a catalog and would like one, leave me a message in the comments, then send me you address. I’ll be happy to send you a free catalog!
Thanks for stopping by Stamping with Buffy. Have a lovely day!
Product List
")


 Woven Ribbon")


Buffy, this is gorgeous. That alcohol background is wonderful and I just love that particular die in that product
LikeLike
Thanks, Jackie! Ever since I learned the “glue on a sponge” tip, I don’t shy away from “open” and intricate dies!
LikeLike
Yes, I love that die too, and it’s nice to see an example of a card that uses it! Thank you, Buffy! It looks like you didn’t apply glue to the entire back of it. Is that right? I am always afraid with a die cut that has such thin lines that the glue will come through and get on the front of the foil. How do you avoid that? Thanks!
LikeLike
Thanks, Lynne! To adhere this die-cut to the card, I clipped a “binder clip” to a sponge wedge (about 1/4-1/3 of a full sponge). Then I dripped a little Multipurpose Liquid Glue onto a palette (actually, it was the lid of the container I keep my glue-y sponge in), then picked up glue on the sponge and dabbed over the back of the die-cut. (I actually tried to glue the entire die-cut, but might have missed a few places.) If you use the Silicone Craft Mat under the die-cut, any excess glue ends up there. If some does get through to the front, I use my Embossing Buddy to “de-stickify” it after it dries. If the Embossing Buddy leaves any residue, you can use a swiffer sheet to clean it up.
LikeLike
Such a gorgeous card! I love the soft ink blended background, and of course that die cut is – well, to ‘die’ for! 😉
LikeLike
Thank you, Deborah! It is a beautiful die!
LikeLike
Gorgeous! I can’t wait to use mine. Thank you for the inspiration! PS: You should take some credit for your amazing granddaughter. You play a big part in her life!
LikeLike
Thanks, Susan! I can’t wait to see what you do! And – isn’t being a grandparent the best?
LikeLike
It is very impressive and pretty in your blog – I can’t wait to see the actual card. (It looks expensive!)
Sent from my iPhone
LikeLike
Thanks, Mom! Well, if you add up everything I used to make this card, it was VERY expensive. 🙂 But I will use a lot of the products (like the Stampin’ Cut & Emboss Machine) more than once, so the more cards I make, the less expensive they get, right? Sadly, I’ve already gotten it ready to mail, so I guess I’ll have to make another for you to see in person. The things I do for my mom! 🙂
LikeLike