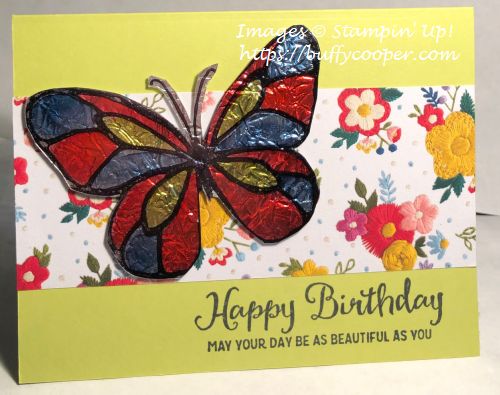
Stained Glass Butterflies
I’m having so much fun with the Stained Glass Window Sheet technique I showed you a few weeks ago. If you missed the post, you can view it here, or the video here.
We used this technique for our Stampin’ Up!® Demonstrator Team Meeting Make & Take this month, as well as for classes. Here’s the card we’re making at classes in May.
How gorgeous is this card? It was everyone’s favorite this month, I think!
It’s such an easy technique. First, stamp the butterfly from the Beautiful Day Stamp Set on a Window Sheet using StazOn Ink. You’ll want to use your Stamparatus, just in case you need to stamp two or three times. Be sure the window sheet is tucked into the corner; the StazOn ink on the window sheet may stick to the stamp, even with a magnet. If the window sheet is in the corner, you’ll know where to “re-place” it if you need to stamp again.
Turn the window sheet over and color the butterfly with Stampin’ Blends. I used Dark Night of Navy, Dark Old Olive, and Dark Poppy Parade. (Note: You do need to color on the back of the window sheet with the Stampin’ Blends. Since Stazon is a solvent ink and the Blends are alcohol markers, the Blends will smear the Stazon if you color on the front. I take a blend and write an “R” on the front for “right side.” This is especially important if you’re die-cutting, as you’ll see in the next section.)
Here’s a little tip about coloring your image. The Stampin’ Blends will kind of move the ink around on the Window Sheet. If you want it darker, simply let it dry for a second or two, then color again.
After your image is colored to your satisfaction, adhere a double sided clear adhesive sheet to the back (the side you colored). I used the Multipurpose Adhesive Sheets, but they have sold out. You can find something similar at a craft or office supply store.
Take a piece of aluminum foil and crumple it. Carefully unfold it and smooth it out so it’s flat but still wrinkly. Then remove the backing from the adhesive sheet and place the foil over the adhesive (shiny side down, of course!). Cut out the image with Paper Snips. If you use a stamp with a coordinating die, you can die-cut the image. If there’s any adhesive poking out behind the window sheet or foil, trim it so it doesn’t gunk up your die-cutting machine.
The rest of my card uses the Needlepoint Nook Designer Series Paper on a Lemon Lime Twist card base. I love how the Old Olive Dark Stampin’ Blend looks very like Lemon Lime Twist on the Window Sheet! My sentiment is also from the Beautiful Day Stamp Set, stamped in Tuxedo Black Memento Ink.
Give this technique a try! It’s sure to please the recipient.
Thanks for stopping by Stamping with Buffy. Have a lovely day.
Product List


This is a beautiful card!
LikeLike
Thanks, Peggy!!
LikeLike
Your butterfly turned out beautifully, Buffy! Having the larger areas for the colour to show through is beautiful.
LikeLike
Thanks, Deborah! This is a great stamp for the technique!!
LikeLike
I love this technique. I am going to definitely have to try it!
LikeLike
You will love this, Susan! It’s so easy and a seriously “WOW” technique!
LikeLike