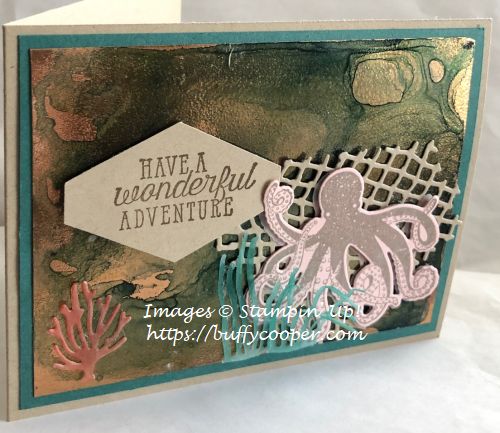
Oxidized Copper
Hi, Stamping Friends! Do you know how hard it is to spell “Copper” when your last name is “Cooper?” Wow. That fourth finger really wants to add that extra “o.”
I watched an Oxidized Metal video from Jay Soriano recently, and I loved the idea. He used Stampin’ Up! Classic Ink Refills, but my friend Holly suggested it might be fun with Brusho Crystal Colour. I tried both, and my results with the Brusho Crystals were much better. First, here’s my card.
And here is how I made it.
First, use an Aqua Painter or Stampin’ Spritzer to add lots of water to a Foil Sheet (mine is copper). Then sprinkle on the Brusho colors. I made this awhile ago, but I think I used Prussian Blue, Gamboge, and Yellow. If the colors aren’t wet enough to spread and “zing” out, add a little more water. I used my Aqua Painter to move the color around a bit.
I’m impatient, so after I got the look I liked, I used a paper towel to speed up the drying process a bit. Then I used my heat tool to finish.
After the panel was thoroughly dry, I added a layer of Versamark Ink, then sprinkled on Clear Stampin’ Emboss Powder and heat set for a nice finish. Quick Edit: Be sure to keep your heat tool moving and not too close to the paper when you dry/heat emboss. You can burn the foil or cause it to pull away from the backing – which can actually be a cool look if you like that kind of distressed look.
This has been sitting on my stamp table for weeks, waiting to be used. I had lots of ideas, but I finally borrowed one from another Stampin’ Up! demonstrator (whose name I cannot remember). This does look a lot like water, so I thought about the Waterfront Stamp Set, but I didn’t know how well the images would show up on the embossed metal panel. I opted for the Sea of Textures Bundle – the Sea of Textures Stamp Set and coordinating Under the Sea Framelits Dies.
First, I die-cut the net from Crumb Cake Cardstock, then the coral and seaweed from Vellum Cardstock. I colored the seaweed with a Light Bermuda Bay Stampin’ Blend, and the coral with a dark Calypso Coral Stampin’ Blend. Then I die-cut the octopus from the Sea of Textures Stamp Set using Blushing Bride Cardstock. (I originally cut the octopus from Vellum, but it just didn’t look really great.) I placed the negative from the die-cut into my Stamparatus, inserted the octopus stamp, closed the plate to adhere the stamp, then added the Blushing Bride Cardstock into the negative from the die-cut and stamped with Gray Granite Classic Ink.
I adhered the net, seaweed, and coral with tiny drops of Multipurpose Liquid Adhesive. The octopus is adhered with Stampin’ Dimensionals, as is the sentiment, stamped in Soft Suede on Crumb Cake Cardstock and punched with the Tailored Tag Punch.
Here’s another look at the card.
I don’t have a video today. I didn’t finish with concerts over the weekend until evening, and it was too dark to create a video. But my Storage by Stampin’ Up! products should be here tomorrow, so I’ll post those later this week.
Thanks for stopping by Stamping with Buffy. Have a lovely day!
Product List


What a neat idea! Do you remember which Brusho colors you used?
LikeLiked by 1 person
Thanks, Renee! I know I used Prussian Blue and Gamboge. I’m pretty sure I also threw in a little Yellow. I didn’t use them all at once, though. I put a little Blue on one side, then some Gamboge, then a little Blue….and just kept adding a mixing until I was happy. A LOT of the color went onto the paper towel, so don’t panic if it’s really dark at first.
LikeLiked by 1 person
If you read this BEFORE the edit in red, be sure to keep the heat tool moving and not too close to the foil sheet when you dry/heat set. It can burn the foil or cause it to pull away from the backing.
LikeLike
I love the idea to seal it all with clear embossing powder – and give it a nice shine, ,too! Great card, Buffy! Techniques are such fun 🙂
LikeLiked by 1 person
Thanks, Deborah! I love techniques.
LikeLike
Pingback: Brusho Oxidized Metal Tutorial | Stamping with Buffy