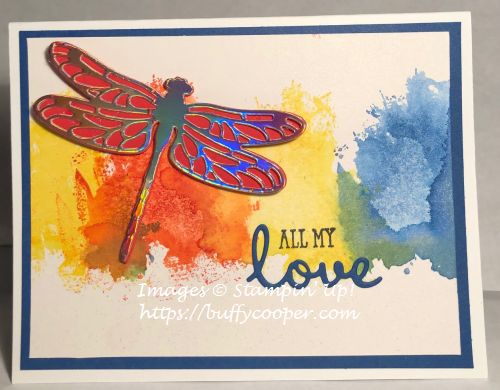
Artisan Dragonfly
When I designed this card for classes this week, I took a chance, because I knew the Grapefruit Grove & Lovely Lipstick Foil Sheets – a free Sale-a-bration Level 1 product from Stampin’ Up!® – were running low. Sadly, they ran out, so I’ll have to redo my project. But it will be easy to change the foil for this card. It was inspired by my friend Jackie (1/3 of the B S & J Challenge team) and a card on Pinterest.
Details
This is a really simple card. I used my Stamparatus® to create the fun background. First, adhere the large stamp from the Artisan Textures Stamp Set along the edge of a 3-3/4″ x 5″ piece of Shimmery White Cardstock. Then ink the stamp with Blueberry Bushel Classic Ink, spritz water in a Stampin’ Spritzer, then close the plate to stamp. Clean the stamp but don’t move it from the plate! Move the plate two hinges down, then repeat the ink/spritz/stamp process with Poppy Parade Classic Ink.
After the Blueberry Bushel and Poppy Parade areas are dry, move the plate back one hinge and repeat the process with Pineapple Punch Classic Ink. Finally, more two hinges and repeat with Pineapple Punch one more time. Using this order gives you a nice rainbow effect with a little green and orange where the colors overlap.
You may be wondering why I used Shimmery White Cardstock. Whisper White or Very Vanilla will work, but I really like to use either Watercolor Paper or Shimmery White Cardstock when I’m using a lot of water. Since this was a background, I chose Shimmery White over the Watercolor Paper, because it does give a nice shimmer to the project. Plus, you can get four layers per sheet instead of two.
While the layer was drying, I diecut the dragonfly using the Dragonfly Thinlits Dies from the Stampin’ Up!® Annual Catalog. The “solid” layer is Poppy Parade Cardstock and the detailed layer is a piece of the Grapefruit Grove Foil Sheet. So gorgeous, don’t you think? If you didn’t select these foil sheets as a free Sale-a-bration item, it’s ok. You can use Gold or Copper Foil sheets instead. (That’s what we’re doing for class.)
Your background should be dry by now, so stamp All my from the Well Said Stamp Set from the 2019 Occasions Catalog in Tuxedo Black Memento Ink, then diecut love using the coordinating Well Written Framelits Dies and Blueberry Bushel Cardstock. These products are sold separately in the Occasions Catalog, but if you bundle them, you can save 10%. And, trust me, you’re going to want them both. I ordered just the dies. Before they arrived, I had another order with some nice Stampin’ Rewards, so I decided to order the bundle. Oops! Totally forgot I had the dies coming. Fortunately, Stampin’ Up!® is awesome about exchanges! Oh, and here’s another bonus. Order the bundle and you’ll earn a Level 1 product from the Sale-a-bration Brochure. Order the bundle and the Dragonfly Thinlits, and you’ll earn a Level 2 product or two Level 1 products. How fun is that?
Layer the two pieces of the dragonfly then add to the card with Stampin’ Dimensionals. Layer the love diecut to the card as shown.
About Layering those Diecuts
Here’s a little tip about adhering skinny pieces to a card. The fine-tip adhesive is awesome, and so is the Multipurpose Liquid Glue. But I tend to make a mess with both of them, because I’m a little adhesive challenged. I lay my die-cuts upside down on a Silicone Craft Sheet, then use SNAIL to cover the back. Excess adhesive stays on the sheet. So easy! If any does tend to linger to the project, simple rub with the Embossing Buddy to remove the stickiness. So easy!
Finishing the Card
Layer the background/dragonfly piece to a 4″ x 5-1/4″ piece of Blueberry Bushel Cardstock, then to a Whisper White card base. Of course, the inside of the card has a mushy message inside. I stamped The best of you has made the best of me sentiment from the Well Said Stamp Set in Blueberry Bushel Classic Ink inside the card. Since I gave a couple of my cards for Mike away, this is another for him. But the card and the Well Said Bundle are so versatile, this could be used for so many occasions – birthday, anniversary, congratulations, thank you, and even sympathy if you tone down the colors a little. Honestly, the Well Said Bundle will carry you through any occasion (except maybe specific holidays), and you’ll want to keep it forever. I gasped at the price tag at first, and then I divided that by the hundreds of cards I’ll make with it. I realized I couldn’t afford not to buy it. Seriously – if you can only afford one stamp set and set of dies in your whole card making career, this is the bundle you need.
Check in tomorrow for a fun vintage card. I had so much fun with it, and I know you’ll enjoy it too.
Thanks for stopping by Stamping with Buffy. Have a lovely day!
Product List


I love how colorful this card is. Thanks for the great tip about using the Craft Sheet! I never heard of that before!
LikeLiked by 1 person
Thanks, Susan! Yeah – I almost always use the craft sheet, because I make a HUGE mess with liquid glue.
LikeLike
I love your rainbow background – gorgeous!
LikeLike